📞 (858) 308-1100
✉️ contact@veslav.com
How to Use Classes and Locations in QuickBooks Online
1/31/20252 min read

Organizing financial data effectively is crucial for small businesses. QuickBooks Online (QBO) offers Classes and Locations – two powerful tracking tools that help business owners categorize income and expenses more accurately. When used correctly, these features provide better insights into profitability by department, project, or location.
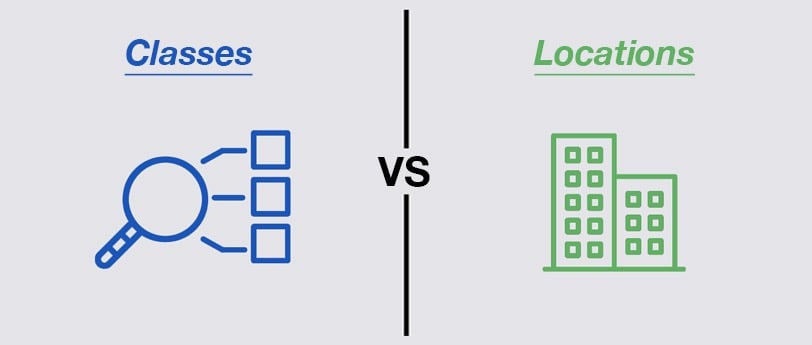
What Are Classes and Locations in QuickBooks Online?
Both Classes and Locations help with financial tracking, but they serve different purposes:
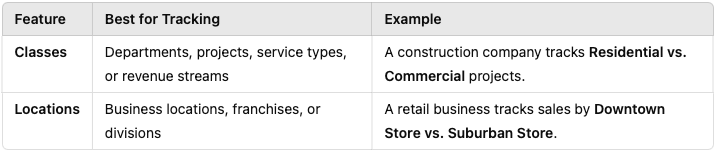
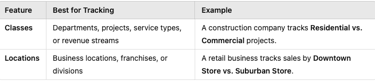
Classes: Track income and expenses by department, project, product line, or service category.
Locations: Track income and expenses by physical or operational location (e.g., multiple offices, stores, or business divisions).
Using these features correctly can significantly improve financial reporting and decision-making.
When to Use Classes vs. Locations
A retail business tracks sales by Downtown Store vs. Suburban Store.
💡 Tip: If your business operates in multiple locations and offers different services, you can use both Classes and Locations together!
How to Enable Classes and Locations in QuickBooks Online
Before using these features, you need to enable them in QBO:
Click ⚙️ Gear Icon > Account and Settings.
Select the Advanced tab.
Find the Categories section.
Turn on Track Classes and/or Track Locations.
Click Save and Done.
How to Set Up Classes in QBO
Click ⚙️ Gear Icon > All Lists > Classes.
Click New.
Enter a Class Name (e.g., "Residential Projects" or "Wholesale").
(Optional) If using sub-classes, check "Is a sub-class" and select the parent class.
Click Save.
How to Use Classes in Transactions
When creating an Invoice, Bill, Expense, or Journal Entry, you’ll see a Class column.
Assign the relevant Class to categorize the transaction.
Run a Profit & Loss by Class Report to see financial performance by category.
How to Set Up Locations in QBO
Click ⚙️ Gear Icon > All Lists > Locations.
Click New.
Enter a Location Name (e.g., "Los Angeles Office" or "Online Sales").
(Optional) Select what you want to track (Sales, Purchases, or Both).
Click Save.
How to Use Locations in Transactions
When entering Invoices, Sales Receipts, Bills, or Expenses, you’ll see a Location drop-down menu.
Assign the correct Location to track revenue and costs separately.
Run a Profit & Loss by Location Report for insights on performance by location.
Common Mistakes and How to Avoid Them
Not Assigning Classes or Locations to Transactions. If left blank, transactions won’t be categorized properly, making reports less useful.
Overcomplicating Class Structures. Too many classes can lead to confusion. Keep it simple and relevant to your business.
Using Classes Instead of Locations (or Vice Versa). If you track revenue streams with locations instead of classes, you might get inaccurate financial reports.
Not Running Reports Regularly. Run Profit & Loss by Class and Profit & Loss by Location monthly to ensure accuracy.
How We Can Help
Properly setting up Classes and Locations in QuickBooks Online can transform how you track your business finances. If you need help with setup, cleanup, or ongoing bookkeeping, our team ensures your financial data is structured for better insights and smarter decisions. Contact us today to streamline your bookkeeping!
Veslav Consulting
Simplifying Your Finances,
Empowering Your Growth
Contact Us
Join our newsletter list
858-308-1100
© 2025 Veslav Consulting. All rights reserved.