📞 (858) 308-1100
✉️ contact@veslav.com
How to Properly Set Up a Chart of Accounts in QuickBooks Online
10/10/20245 min read

The Chart of Accounts is the backbone of your bookkeeping system, acting as the organizational structure for all your financial transactions. When set up properly, it provides a clear picture of your business's financial health, helps track your income and expenses, and ensures accurate financial reporting. However, during our QuickBooks Online cleanup services, we often see small business owners struggling with a poorly organized Chart of Accounts, leading to inaccurate reports, unnecessary complexity, and frustration.
In this post, we’ll explain what a Chart of Accounts is, the key components of a well-organized chart, and best practices for setting it up in QuickBooks Online to ensure you’re tracking your finances correctly from the start.
What is a Chart of Accounts?
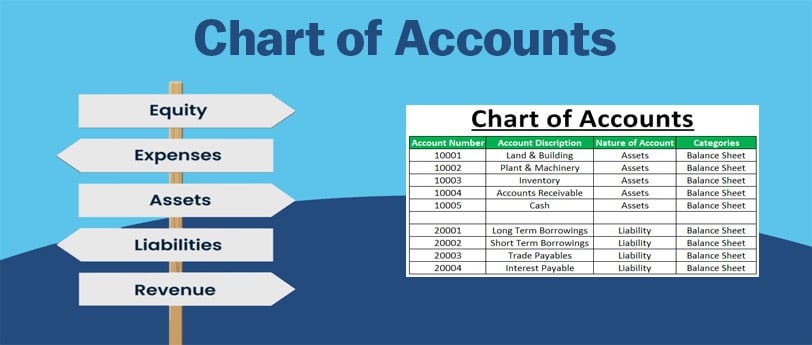
A Chart of Accounts (COA) is a list of all the financial accounts used in your business. Each account tracks specific types of transactions, such as sales, expenses, assets, and liabilities. Think of it as a map that categorizes your business’s financial activities so you can generate accurate reports like the Balance Sheet and Profit & Loss statement.
The accounts in your COA fall into five main categories:
Assets – What your business owns (e.g., cash, equipment, inventory)
Liabilities – What your business owes (e.g., loans, accounts payable)
Equity – The owner’s interest in the business (e.g., retained earnings, capital contributions)
Income (Revenue) – Money your business earns from its operations (e.g., sales, services)
Expenses – Costs your business incurs to operate (e.g., rent, utilities, office supplies)
Each account in the Chart of Accounts serves a specific purpose and should be tailored to fit your business’s operations.
Common Mistakes in Setting Up the Chart of Accounts
While setting up a Chart of Accounts may seem straightforward, we often see several recurring mistakes that can lead to confusion and reporting errors:
1. Overcomplicating the Chart of Accounts
One of the most common mistakes is creating too many accounts, leading to unnecessary complexity. For example, instead of having a single “Utilities” expense account, a business owner may set up separate accounts for electricity, water, and internet. This level of detail isn’t usually necessary for most small businesses and can clutter your books, making it harder to track key financials.
How to avoid it: Keep your Chart of Accounts simple and focused. Consolidate similar expenses under broad categories (e.g., "Utilities" for electricity, water, etc.) unless you need detailed tracking for specific purposes like tax deductions.
2. Using Incorrect Account Types
Many business owners misclassify transactions by assigning them to the wrong account type. For example, categorizing an expense as an asset, or recording a loan as income. This leads to inaccurate reports, making it difficult to understand your true financial position.
How to avoid it: Make sure you understand the difference between account types (assets, liabilities, income, etc.) and assign transactions to the correct category. If you're not sure, consult a professional for guidance.
3. Not Updating the Chart of Accounts Regularly
Business owners often set up their Chart of Accounts when they first start using QuickBooks Online but neglect to update it as the business evolves. As new income streams or expenses arise, they should be reflected in your COA. Without regular updates, you may miss out on tracking important financial activities.
How to avoid it: Regularly review and update your Chart of Accounts as your business grows. Add new accounts, when necessary, but avoid cluttering your COA with unnecessary details.
4. Not Using Sub-Accounts for Granularity
While overcomplicating the COA can be an issue, failing to use sub-accounts where needed can limit the clarity of your reports. Sub-accounts allow you to track specific transactions within a broader category without cluttering your main Chart of Accounts. For example, under “Marketing Expenses,” you could have sub-accounts for “Online Advertising,” “Print Advertising,” and “Events.”
How to avoid it: Use sub-accounts to organize expenses and revenues that need more detail. This approach provides a balance between simplicity and the ability to drill down into specific categories.
How to Set Up Your Chart of Accounts in QuickBooks Online
Here are the key steps to properly set up your Chart of Accounts in QuickBooks Online:
1. Define Your Business’s Key Financial Categories
Before diving into QuickBooks Online, start by outlining the core financial categories that are relevant to your business. At a minimum, you’ll need the following types of accounts:
Bank Accounts: Set up separate accounts for your checking, savings, and credit card accounts.
Income Accounts: Set up categories to track the revenue your business earns. For example, you might have separate income accounts for “Product Sales” and “Service Revenue.”
Expense Accounts: Include categories for major expenses, like “Rent,” “Payroll,” and “Office Supplies.”
Asset Accounts: Set up accounts for any business-owned assets, such as “Inventory,” “Equipment,” and “Accounts Receivable.”
Liability Accounts: Create accounts to track money your business owes, such as “Loans Payable” and “Accounts Payable.”
Equity Accounts: Set up an “Owner’s Equity” or “Retained Earnings” account to track the owner's financial interest in the company.
2. Customize Accounts to Fit Your Business
While QuickBooks Online provides a default Chart of Accounts template, you should customize it to reflect your specific business needs. For instance, if you run an eCommerce store, you may need separate accounts for “Shipping Income”, “Cost of Goods Sold”, and “Merchant Service Fees”, while a service-based business may not need those categories.
How to do it in QuickBooks Online: Go to Settings > Chart of Accounts and click New to add new accounts. You can also edit or delete any unnecessary accounts from the default list.
3. Use Sub-Accounts for Detailed Tracking
If you want more detail tracking without cluttering your main Chart of Accounts, use sub-accounts. For example, under “Insurance Expense,” you can create sub-accounts for “Health Insurance,” “General Liability,” and “Workers’ Compensation.”
How to do it in QuickBooks Online: When creating a new account, select the “Is sub-account” checkbox and choose the parent account it will fall under.
4. Assign Account Numbers for Better Organization
Using account numbers is an optional feature in QuickBooks Online, but it can help you organize and identify accounts more easily, especially as your Chart of Accounts grows.
How to do it in QuickBooks Online: Go to Settings > Advanced and turn on the “Enable account numbers” option. You can then assign numbers to each account in your Chart of Accounts.
5. Review and Update Regularly
As your business evolves, so should your Chart of Accounts. Make it a habit to review your COA every quarter to ensure it still fits your business’s needs. Add new accounts when necessary, and merge or deactivate any accounts you no longer use.
Why a Well-Organized Chart of Accounts is Crucial
A properly set up Chart of Accounts ensures that your financial transactions are categorized correctly, which in turn helps you generate accurate financial reports, prepare for tax season, and monitor your business’s financial health. Without a clear and organized COA, it’s easy to misclassify transactions, leading to confusion and potential tax issues.
Need Help Setting Up or Cleaning Up Your Chart of Accounts?
At Veslav Consulting, we specialize in QuickBooks Online cleanup and setup services. Whether you’re starting fresh or need help cleaning up a messy Chart of Accounts, our team can ensure that your accounts are properly structured to give you accurate financial insights.
Contact us today to get started and let us take the stress out of managing your books.
Veslav Consulting
Simplifying Your Finances,
Empowering Your Growth
Contact Us
Join our newsletter list
858-308-1100
© 2025 Veslav Consulting. All rights reserved.